Maybe you’ve gone into a mirror fun house that has all those weird mirrors that make you look 10 feet tall, skinny in the middle and wide at the top.
- Obviously these are not regular, plane mirrors. Instead, they’re all curved and bumpy and misshaped.
- Don’t worry, we’re not going to be analyzing mirrors that are that weird, but we will be looking at curved mirrors.
- Imagine taking a giant ball and cutting a section out of it. You spray some shiny paint on the inside and outside and you have a curved mirror.
- The first kind we will be looking at is a concave mirror, which would mean that you made the inside of the ball shiny.
- Then we will look at convex mirrors, where the outside of the ball was made shiny.
Concave Mirrors
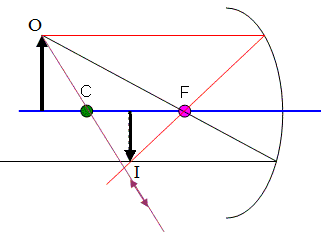
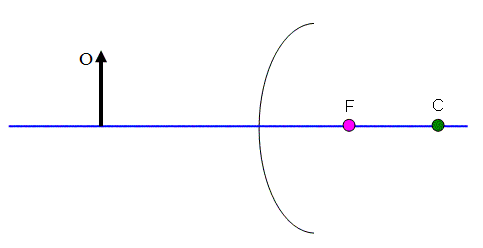
To be able to figure out how an image will be formed in one of these concave mirror, you need to be aware of a few basic “parts”. Check out Figure 1 and the description of each part that follows.
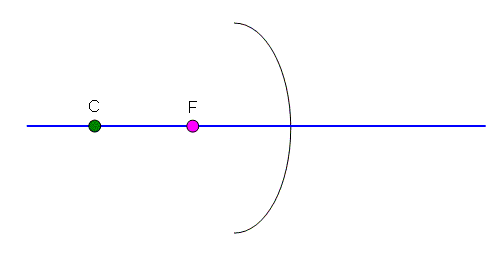
Centre (C)
The centre shown in the diagram is where the centre of the sphere would be. In the diagram I have drawn I’ve had to exaggerate the shape of the mirror a bit to be able to use it in some of the diagrams later on, but you should be able to get the basic idea. Like a regular circle, the distance from the centre to the surface of the mirror is the radius.Focus or Focal Point (F)
If an object was infinitely far away from the mirror, the light from it would converge on this one point. In the diagrams we are doing we will mostly be looking at how some light rays pass through (or appear to pass through) this focal point. The focal point is exactly in between the mirror and the centre. Since the distance between the centre and the mirror is the radius, the distance from the focal point to the mirror is half of the radius.Principle Axis
The blue line is the principle axis, a line that we will use as a reference point in our diagrams. It passes through the centre and is perpendicular to the surface of the mirror.
There are three rules you need to use to figure out where the image of the object will appear. You only need to use two to actually locate the image, but you can use the third as a check.
- All of the rules involve what a ray will do when leaves the object.
- You will need to have a ruler to draw the lines when you figure out these problems.
- When you sketch the curved mirror itself, you’ll find you don’t have to be too careful about making its shape perfect… close enough will give you decent results.
- The object we will be using in these examples is an arrow pointing up... that way we will have an easy time seeing if the image is inverted or not.
- The image will appear where any two reflected rays cross.
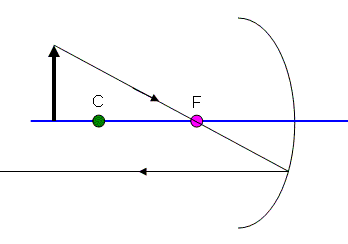
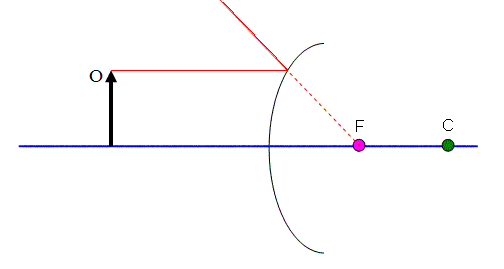
Rule #1: Any ray through the focal point will reflect parallel to the principle axis (Figure 2).
Don’t start worrying about how that ray of light came off the object and went straight through the focus… it just did. Light reflects off objects at all sorts of angles, and if it will help us to find where an image is, we might as well assume one ray goes right through the focus.
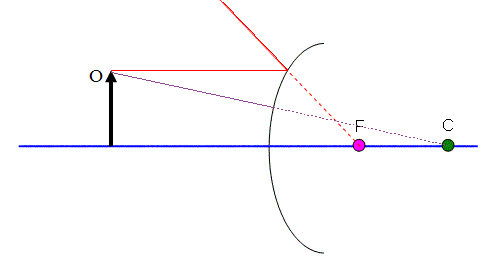
Rule #2: Any ray parallel to the principle axis will reflect so that it passes through the focal point. (Figure 3)
I know this sounds exactly the same as the first rule, but look at it carefully and you’ll see that it is the opposite.
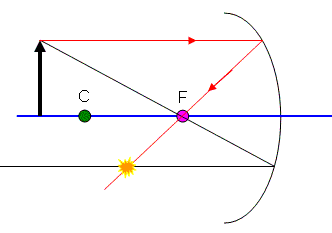
Notice the spot where I marked the red ray crossing the black ray from rule one… this shows me where the image will appear.
- Since all my rays were drawn from the tip of the object, this shows where the tip of the image will be.
- I know that since the base of the object is on the principle axis, it will appear there in the image also.
- We draw the image as a solid line because the rays of light that make the image are actually traveling through that point… if I was to hold a piece of paper right there, I would see the image appear there! It is a "real" image.
- Also notice that the image is upside down (inverted) and slightly smaller than the original.
- This is not always the case with concave mirrors. You might even find that your rays need to be extended to behind the mirror to be able to be able to cross each other… then the image would be a virtual image behind the mirror.
For any image, you will need to classify it as:
- Real or Virtual
- Erect or Inverted
- Smaller, Bigger, or Same Size
Although we know where the image is, and that it is a real, inverted, smaller image, we can still confirm it using our last method…
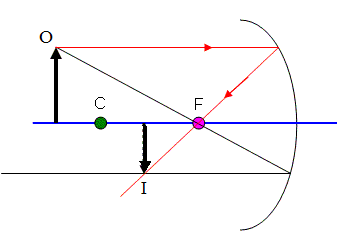
Rule #3: Any ray that passes through the centre will reflect back through the centre.
Unfortunately, this is the least reliable way to draw a ray, since small errors in the quick sketches we draw will become big errors. Still let’s try it here in Figure 5.
I had to assume that if the mirror was big enough it would have bounced back somewhere around there. Notice that it hits just about where the other two rays meet up. We’re probably doing ok.
- Always keep in mind that you will usually only use two of these three rules. Try to use the first two whenever possible. Only use the third rule if you have to.
Convex Mirrors
The same set of rules shown above apply to convex mirrors, it’s just that things will look a bit different since convex mirrors have their focal point and centre behind the mirror.
- Convex mirrors also typically make a small, virtual image of the original object.
Let’s look at an example using the three rules covered above for concave mirrors.
- The only difference is that I will extend the rays behind the mirror as dotted lines to be able to show how they “pass through the focal point” or “through the centre”.
Use Rule #2 (because it works well for this mirror) to draw the ray coming off of the tip of the object parallel to the principle axis as shown in Figure 7. When it hits the mirror, it bounces off so that a dotted line drawn behind the mirror will pass through the focal point .
Rule #3 (again, just because it works well for this mirror) is used in Figure 8. This ray comes off of the tip of the object aiming straight for the centre. Where it hits the mirror it will bounce back, but I draw a dotted line behind the mirror to show where the ray would have gone.
Notice that there is now a place where the two dotted lines hit. This is where the image will appear.
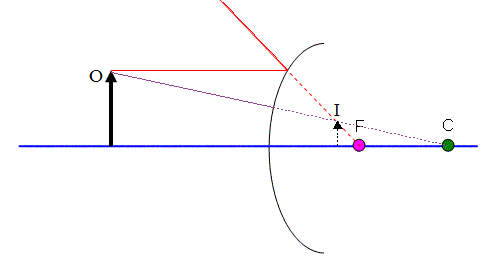
The image is virtual (it’s behind the mirror), it is erect (right side up), and shrunken down a bit.
The Formulas
There are a couple of formulas you can use to figure out where an image will appear, if it will be inverted/erect, and magnified or shrunk.
The first is called the "Mirror Formula"...
f = focal length (m)
do = distance from mirror to object (m)
di= distance from mirror to image (m)
Ultra-Special Notes for Using the Mirror Formula:
- Concave Mirrors have positive focal length, and convex mirrors have a negative focal length.
- Distances are positive if they are in front of the mirror, and negative if they are behind.
- All measurements are made along the principle axis from the surface of the mirror.
The "Magnification Formula" is...
Same as above plus...
hi = height of the image (m)
ho = height of object (m)
m = magnification (how many times bigger or smaller)
Ultra-Special Notes for Using the Magnification Formula:
As above plus...
- Positive heights are above the principle axis, and negative heights are below the principle axis.
- Positive magnifications are above the principle axis, and negative magnifications are below the principle axis.
- Magnifications greater than 1 are bigger than the original object, magnifications less than 1 are smaller than the original object.
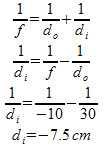
Example 1: A convex mirror has a radius of 20 cm. An object is placed 30 cm in front of the mirror. Determine where the image will appear.
Since the radius is 20 cm (which is the distance from the mirror to the centre), and since the focal point is half ways in between and negative for a convex mirror, f = -10 cm.
Since di is negative, it appears behind the mirror as a virtual image.
Example 2: For the same situation from Example 1, determine how tall the image is if the object is 5.0cm tall. Also determine the magnification.
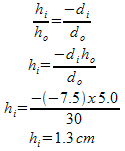
To calculate the magnification either distances or heights could be used. Since the distances have been through less calculations, I trust them more.
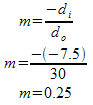
The magnification is positive, since the image is erect. But it less than one, so the image is smaller than the object... one quarter the size!